Category Archives: Air Tight

Seattle Passive House – Draftless in Seattle with a .41ACH!

David Vollan of Home Performance, Inc. came out to do Dan’s 2nd blower door test today.  It was a resounding success.  The house registered a .41 ACH @ 50 pascals.  The Tectite Building Airtightness software v 3.2 projected a 121cfm for anyone wanting to know the PH Nerd Numbers.  Way to go Dan!

Dan has had some other accomplishments this past week – he passed his electrical, plumbing, and framing inspections!  He said that he noticed the draft from the positive pressure in the sewer line was blowing a continual stream of cool air through the plumbing ventilation stack and was concerned that with all the sealing he was doing, that this is a leak he could not prevent.  In Seattle homes are required to have a plumbing vent that exits the building envelope and allows the sewer gas to escape.  This is for health reasons.  AAV’s or Air Admittance Valves are another way to deal with this issue in a way that would not affect the building envelope.  Dan was told that he would not be able to do that on this project.  Another Certified Passive House Consultant, Tad Everhart has been successful in getting a code alternative allowed for his project in Oregon and he is using a combination of solutions for the negative and positive pressures that need to be addressed.  Tad used Studor AAV’s for the negative pressures and installed a 2 way valve for the positive pressure instead of the traditional plumbing stack vent.  You can see more of what Tad did regarding his PH project here.
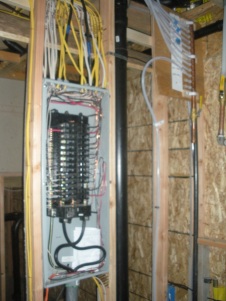
Next up is drywall and painting while Dan works on the landscaping.  Time to make this Passive House look more like a home!

Seattle Passive House – Chasing the wind…

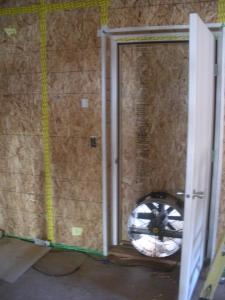
Dan is actively sealing his house as well as getting past a few more milestones.  Most of the stairs are in, the ventilation system is being piped in and sealed.  Stu returned to make another appearance and Dan put him to work.  Dan has sealed the doorway between the workshop and the utility room with OSB and tape.  He installed a fan in the door and is using that to pressurize the house so he can go around and look for leaks.  He will be gluing and taping the areas he finds and another official blower door test will be run.  Dan has also promised a first hand report of his experience with the air tight sealing methods when he can get time to turn around twice.

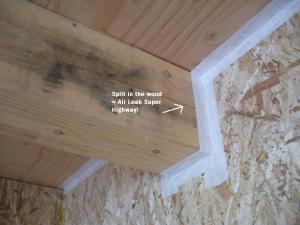
A very interesting air leak showed up during the testing.  In the ADU Dan has installed wooden beams.  Because the structure changes at that point from the Larsen Trusses that had the structural support on the front cord to 2X walls with the support on the outside, the beams had to pass through the air tight layer of OSB.  Dan sealed around each beam, but when the building was pressurized he discovered that splits in the wood acted like an Air Super Highway.  He said you could just feel the wind racing through the cracks.  He plans to fill the cracks with putty and sand them down since the beams are going to be left exposed.  Stay tuned!  -Linda

Seattle Passive House – Measure twice, cut once. Measure once, blower door twice?

I left you with quite a cliffhanger regarding Dan’s project and the blower door test.  I thought I would explain a bit about the Passive House concepts that are affecting the results.  Passive House projects are measured in a variety of ways. 

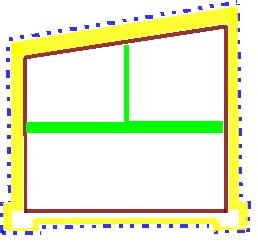
For determining the Annual Heat Demand, the Gross Enclosed Volume of the building is used – that is the area enclosed by the  extreme outside of the thermal envelope.  In this cross-section of one part of Dan’s project the Gross Enclosed Volume is represented by a dashed blue line.  The yellow represents the insulation in the walls and under the slab.  The red line is the OSB and top of the slab that create the air tight layer.

For Ventilation purposes, the Net enclosed Volume of the building is used.  This is where the question of the project passing the blower door test got a little sideways.  In America, pressurization tests use different volume measurements normally and a number equivalent to the volume enclosed by the air tight layer (including interior walls and floors) was calculated.

For Passive House purposes a more conservative number is to be used for the Net Enclosed Volume.  Basically  it is the empty area that is ventilated within the thermal envelope.  For this project that is all the blank space within the red air tight layer EXCEPT for the bright green area that makes up the floor and interior walls.  The argument can be made that these constructions are not built air tight and will become pressurized and ventilated, but Passive House measurements are conservative and these volumes are not included in the Net Enclosed Volume.

Dan will be crunching the numbers, air sealing some more with the wonderful tape that Siga sent for the project, and trying again to keep under the .6ACH @ 50 pascal requirement that certified Passive House projects must reach.  He is very determined to do so.  He allowed for this scenario when he planned the blower door test.  His air tight layer is still accessible and he does have the opportunity to go back and make changes easily.  When planning your Passive House project, make sure you plan ahead so that you too can tighten the air tight layer if necessary without a lot of fuss.

Dan has really done a remarkable job with his project and I for one am learning so much from following it and presenting it to you on this blog.  Thanks for following along!

-Linda

[updated to clarify interior wall and floor volume are not included in the Net Enclosed Volume.]

Seattle Passive House – The Blower Door huffed and it puffed…

…but did Dan’s house reach 0.6ACH @ 50 pascal?  The answer is a resounding “maybe”.  Between needing a smaller cowl for the blower door (a temporary cardboard one was crafted) and a question of volume it was most likely between 0.5 and 0.7ACH & 50 pascal – definitely in the ballpark.

Dan was really impressed with the Siga tape – thank you Siga!  Albert Rooks of the Small Planet Workshop will be a US distributor for it in the future.

I will post an update with details as they are available.

Seattle Passive House – Air tight or full of hot air?

Let’s have some fun in anticipation of the blower door test next week.  I for one am glad that Dan is pushing the envelope to find out just how much effort and what materials are needed on his project to achieve the Passive House air tight requirement.  I know that many people are following this blog and are interested in the construction techniques that he is using.  I would bet that more than a few wonder for themselves just how much attention to detail is necessary and, for cost and schedule considerations, what is not.

Just to recap, here is part of a comment Dan made recently on the post I made regarding the insulation that was blown in.  (I appreciate the additional information – thanks Dan!)  “When it comes to air-sealing, the approach is a bit of an experiment. Up to this point, I have been using both glue and building gaskets. I will be using tape in a number of locations. (I’m hopefully going to get to utilize some of the famed Siga tape.) When the fateful day of the Blower Door Test arrives (tentatively scheduled for June 29) we’ll know the air-tightness of the different methods. Then I can better approach the balance of effectiveness/materials cost/ installation time for all those future PH Projects.
Nearly every part of the Air Barrier will still be accessible throughout so I can [get] into and out of any leaky/sticky situations. Doughnuts & coffee for anyone who wants to be there for the fateful moment when the pressure’s really on…”

Here’s your chance to share your opinion: